
We here at Birch have been so lucky to work with Christina McKinney. An amazing designer and seamster. She's gone to the deep end to pull up this adorable new plushie pattern, which is available as a free download! Make sure to pin this project and tell all your friends about it. We are just in love with these little guys!

I’m so happy to be bringing you another fun tutorial for Birch!
This design was inspired by the fabulous new Eiko collection by Jay-CynDesigns. The mini version is perfect for little hands to manipulate and chew,
while the larger one is GREAT for snuggles!! Fish happen to be the current
design in my son’s nursery, so I’ll be adding a few of these to his decor for
sure!
Tips before you begin: Seam
allowance is 1/4 in unless otherwise stated. If you have a directional print,
pay careful attention when you cut your pieces to make sure everything lines
up. Read the pattern pieces carefully before cutting. They are all marked with
directions to aid in cutting & sewing. This project requires quite a bit of
pinning at a few points but I DO NOT recommend running over pins as you sew.
Press all your fabric before cutting.
Supplies:
1/4 yd main fabric
1-2 fat quarters for fin & tail accent fabrics
polyfil stuffing
printed pattern pieces
chopstick for turning & stuffing
Pattern is available in 2 sizes! The large fish has a finished
measurement of 15 1/2in X 10in & the small fish measures 9in X 5 1/2 in.
(The smaller pattern is a 65% reduction of the larger)

First you will assemble your top, side, and bottom fin pieces.

With right sides together, match up each set & sew. Leave the long side of each piece open for turning and stuffing. Once each piece is stitched, clip your curves all the way around before turning. This will help the curves lay properly. Just be sure not to cut through your line of stitching!


Turn all 4 fins right side out and press.

Once all 4 fin pieces are complete, lightly stuff them with
polyfil. Basically, just fill them to your desired fluffiness - there’s no
right or wrong here!

Then, using the lines on the pattern pieces as a rough guide,
add lines of stitching to each fin piece. I find that placing a few pins in the
piece helps keep the sides even and prevent puckering. Also, flatten the piece
and keep it held firm as you run it through your machine. As long as you don’t
add *too much* bulk here, it should pass through without a problem. Repeat
these steps with all 4 pieces, using the pattern pieces for stitch placement reference.
Once all 4 are complete, set these aside.


Next, match up & stitch your tail and body pieces together
along the triangle edge. (I know, this looks odd. It will make sense soon!)
Make sure you have matched the correct body piece with it’s corresponding tail
piece. With right sides together, and using your pattern piece for a stitch
guide, sew the pieces together along along the triangle side. Be sure to secure
your start and stop points since you will be ironing this flat.


Once stitched, snip the inner corners and trim the point for
easier turning.


Turn right side out and press, with the triangle point toward
the tail. Repeat these steps with the other body/tail pieces as well.


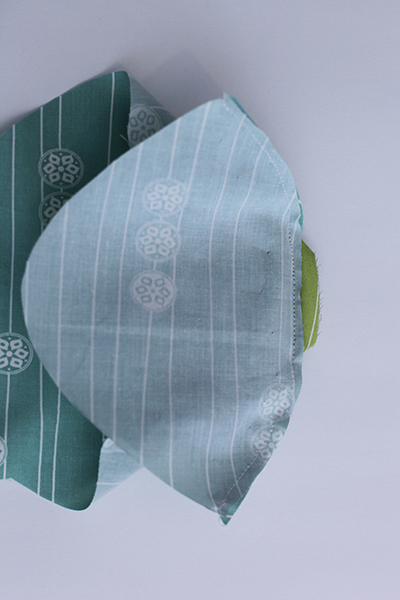
This is what your inner seam will look like:

Once pressed, topstitch the triangle point on each side. Try to
stay close to the edge. Your line will start and stop at the straight edge seam
on either side of the triangle.

Using the dot on the body & side fins as a guide, place one
side fin on the body. Be sure to extend about 1/4 in or more of the fin past
the edge. Adjust it as needed to make sure it’s sewn into the seam allowance.

Now pin the head in place along the rounded curve, with the fin
sandwiched in between. Body & head pieces should be right sides together.
(Ensure you have your fin oriented properly before pinning & sewing.) I
find the easiest method for pinning along a curve is to find the center of both
the body and head piece and pin there first.


Then, work your way up and pin, then down and pin. (I find that
things line up better this way than if I start at the top.)


Stitch along the curve making sure to secure your start and
stop points.
Once you have stitched each curve in place, make sure you have
caught both sides with the fin in between. If everything is sewn properly, snip
the rounded curve to aid in turning. Trim off the protruding inner piece of the
fin so that it is flush with the seam allowance. Press your curved seam. Repeat
this with the opposite body/head/side fin pieces.

With each side piece assembled, you’re now ready to attach the
final two fins. Lay one body piece right side up. Using the pattern piece
placement dots as a guide, place your top and bottom fin pieces. The raw edges
of the fins should stick out at least 1/4 in past the edge of the body piece.

Lay the opposite body piece on top, match up all your seams, and pin in place.

At the point where your body and tail meet, you will sew a small “V” rather than follow the curve. I find it easiest to simply mark the line to follow with a pencil before I stitch. This “V” will ensure that your tail and body seams lay properly when turned.

Before you begin stitching, designate a start and stop point
with your pins leaving a small opening for turning and stuffing. Because of the
fin placement, I find that the top or bottom portion of the tail is the best
place for this.

Stitch slowly around the edge, making sure to catch all sides
and your fin pieces as you go. Check all edges before snipping your corners and
trimming. At the joint between your tail & body, you will snip a “V” along
your stitching edge.

Once all edges are snipped, turn right side out and press.

Using your chopstick or other (blunt) turning tool, stuff your
fish to desired firmness. The method used for sewing and stitching the tail to
the body created a small triangle pocket on the inside of the fish. This inside
triangle does not need to be stuffed. (The tail looks the same whether the
triangle is stuffed or not.) Once the fish is filled, use a blind or ladder
stitch to close your opening in the tail.


Then, sew up a few more so you have your own school of snuggly
fish!!

Thank you Christina for this amazing pattern and tutorial. We can't wait to make a ton of these!

Totally AWESOME!!! I love these & will make a "school" of them for my Lil Mer-Gran in Germany!! Thank you SEW much Christina for this pattern & tutorial!!
ReplyDeleteBirchfabrics: Pdf Pattern And Tutorial: Pond Fishy Plushies By Christina! >>>>> Download Now
Delete>>>>> Download Full
Birchfabrics: Pdf Pattern And Tutorial: Pond Fishy Plushies By Christina! >>>>> Download LINK
>>>>> Download Now
Birchfabrics: Pdf Pattern And Tutorial: Pond Fishy Plushies By Christina! >>>>> Download Full
>>>>> Download LINK sh
Oh I just love these! I'm making some next week for my little granddaughters, and the new baby to be! Love it! Thanks so much for the awesome tutorial
ReplyDeleteToo much fun! Thanks so much for this.
ReplyDeleteDonna, Barrie, Ontario
These are soooooo cute I can't wait to make some
ReplyDeleteI love these :)
ReplyDeleteI just made my first one. You explained so well that it was a breeze! Thank you so much!
ReplyDeleteGreat tutorial!Awesome fish!!!
ReplyDeleteThanks for sharing!
hugs
I CANNOT figure out the part where i add the head section to the body! It is driving me mad. So jelly you all found this tutorial to be so easy. I feel like a whole section was skipped. It appears in the pic that all the only thing sewn is over top of the fin and head. I am so confused.
DeleteSo lovely. Thank You so much.
ReplyDeleteWe're having an "Under The Sea" Party for my daughters 3rd Birthday..these will be perfect gifts for the kiddos!
ReplyDeleteAbsolutely perfect! I love everything about them. :) TFS
ReplyDeleteThanks for the free pattern! I noticed there are 2 different size fish and one pattern. Wjat size fish does that pattern make that you graciously gave us for free? Thank you!!
ReplyDelete| dekoratif sütun | söve modelleri | dış cephe | http://www.metpordekor.com/ | söve | söve taçları | dış cephe söve | söve nedir | mantolama | söve modelleri |
ReplyDeleteOur College Term Paper services have enabled many students to excel in their studies that make us proud of contributing to the success of student life. It is important to note that, the Custom Dissertation Services that we offer to our clients are usually original and written from scratch by our qualified writers.
ReplyDeleteI noticed many of the comments were from quite a few years ago...but I just made this, this evening. I LOVE it!! I was looking for a smaller fish to make, to use with another project, and this turned out nearly perfect. The imperfections were just my inexperience, but added some character to it, ha! Thank you for this pattern and the instructions and pictures were perfect!
ReplyDeleteI really liked the art of this creative seamster. It has really interesting designs for kids.
ReplyDeleteدانلود اهنگ شاد
آهنگ
آهنگ تتلو
Thanks for sharing
ReplyDeletepure banarasi silk dupatta
مهدی احمدوند
ReplyDeleteIf we are going to talk about murals, it is a harsh reality that there are people who do not appreciate artworks like this. I fell bad, but there is less that I can do; I want them to realize that murals are beautiful and worth appreciating. But I simply don't know where to start. Sometimes, I think of writing as my way to influence people to appraiser things that should be appreciated. I don't know if that is going to be effective, but I want to give it write my assignment for me a try.
ReplyDeleteA PDF pattern is a digital version of the printed pattern. If you were to take a piece of tissue on which a pattern was printed. wood floor water damage repair
ReplyDeleteBirchfabrics: Pdf Pattern And Tutorial: Pond Fishy Plushies By Christina! >>>>> Download Now
ReplyDelete>>>>> Download Full
Birchfabrics: Pdf Pattern And Tutorial: Pond Fishy Plushies By Christina! >>>>> Download LINK
>>>>> Download Now
Birchfabrics: Pdf Pattern And Tutorial: Pond Fishy Plushies By Christina! >>>>> Download Full
>>>>> Download LINK JT
Thanks for the best blog. it was very useful for me.keep sharing such ideas in the future as well.barbie collection
ReplyDelete